Search This Blog

Friday 18 January 2013

Understanding XML and identifying Groups of repeating elements


Understanding XML and identifying Groups of repeating elements

 Defining Groups

By defining a group, you are notifying XML Publisher that for each occurrence of an element, you want the included fields displayed. At runtime, XML Publisher will loop through the occurrences of the element and display the fields each time.
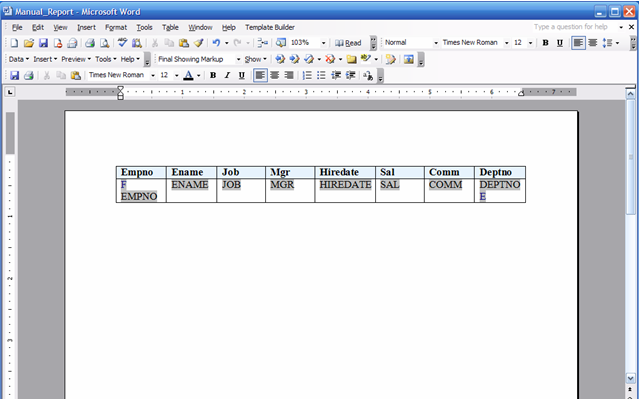
In the example, for each occurrence of G_VENDOR_NAME in the XML file, we want the template to display its child elements VENDOR_NAME (Supplier Name), G_INVOICE_NUM (the Invoices group), Total Entered Amount, and Total Accounted Amount. And, for each occurrence of G_INVOICE_NUM (Invoices group), we want the template to display Invoice Date, PAYMENT_METHOD_LOOKUP_CODE, SET_OF_BOOKS_ID, APPROVED_AMOUNT To designate a group of repeating fields, insert the grouping tags around the elements to repeat. Insert the following tag before the first element:
<?for-each:XML group element tag name?>
Insert the following tag after the final element:
<?end for-each?>
Grouping scenarios
Note that the group element must be a parent of the repeating elements in the XML input file.
·         If you insert the grouping tags around text or formatting elements, the text and formatting elements between the group tags will be repeated.
·         If you insert the tags around a table, the table will be repeated.
·         If you insert the tags around text in a table cell, the text in the table cell between the tags will be repeated.
·         If you insert the tags around two different table cells, but in the same table row, the single row will be repeated.
·         If you insert the tags around two different table rows, the rows between the tags will be repeated (this does not include the row that contains the "end group" tag).

Our data model looks like

Query we had used for creating data model is shown below
SQL>SELECT pov.vendor_name, 
               ai.invoice_date, 
               ai.invoice_amount,
               ai.payment_method_lookup_code, 
               ai.set_of_books_id, 
              ai.approved_amount
  FROM po_vendors pov, ap_invoices_all ai
 WHERE pov.vendor_id = ai.vendor_id;

Now we have to generate XML which we had learnt in previous lesson


Save the XML file in appropriate location which is used to load data in RTF.

Now we have to construct RTF

Creating First report with Basic RTF method


Creating First report with Basic RTF method

Here also we have to design data source and an RTF.
In the previous lessons we had learnt how to create data model
In this our data model looks

For above data model we have to generate XML and create one RTF

First generate XML. For that in the report builder go to File=>generate to file=>XML which is shown below


When ever we click on XML system will ask to where to save this XML file which is shown below


Save it in appropriate location for future reference
Click on ‘SAVE’.

Now we have to Design our template layout:

Use the Microsoft word or any word processor to generate the template layout, while saving save the document with RTF extension. Let us call this template file as Usng_basic_RTF.rtf


First and most thing we have to do while creating layout is we have to load data first i.e... we have to load XML data what we had generated.

Now we have to Associate XML data to layout

Once XML publisher is installed successfully, a new menu bar will be found by name “Template Builder”. Navigate through Template Builder => Data => Load XML Data.
        Which is shown below.

In the RTF we are going to create layout
we have to construct Table for placing Column names and their fields shown below.
Why we have to construct table is because if we place directly fields in the RTF the display format of the output is not good. That’s why we have to construct table.

For that follow below navigation in the picture
Table=>insert=>table

When ever click on the ‘Table’ system will ask how many rows and how many columns want which is shown below

Here we are going to take 4 columns and two rows which shown above. After giving proper rows and columns according to our requirement then click on ‘OK’
Then in the RTF we can see the ROWS and COLUMNS what ever the number we had given which is shown below

There we can place column names and fields according to their column name.

First we are going to write column names in each segment which is shown below


Now we have to write XML tags directly to specific column according to that column name by seeing the .xml file what we had generated.
Our XML file looks like


From the above picture we are seeing that there is XML tags which we are going to take as source in the RTF which is shown below

Now we have to publish the report

Click on Template Builder => Preview => HTML/PDF/Excel/RTF (any format).
We can get below output

By seeing above output we are seeing only one record. But in the ‘EMP’ table we have 14 records.

In the report builder we will use repeating frame for repeating the data. In the same way we will use some XML Tags like => <?FOR-EACH:<Group_name>?>(just like loop). When ever we open loop we have to end the loop. Here we use XML Tab like =<?end for-each?>(just like end loop)
For getting all records which are in ‘EMP’ table

<?FOR-EACH:<Group_name>?>   => we have to write before first column itself

<Group_name>=> we will get from XML ouput. Go to XML ouput there we can see ‘G_EMPNO’ which is nothing but group name


There we can see XML tag which we are going to provide in <?for-each:<group name>?> like <?for-each: G_EMPNO?>

<?end for-each?>   => we have to write after the last column.

Now we are going to use these XML tags in RTF.

Which we can see in below picture

Now we have to publish the report

Click on Template Builder => Preview => HTML/PDF/Excel/RTF (any format).
We can get below output

Now all Records got appeared which is shown above

Creating First report using wizard


Creating First report using wizard

We had already learnt that how to create a report in Report Builder.
In the normal report we will create data model and layout model, but in XML Publisher we will create a data model and RTF (Rich Text Format).
So, by using below Query we are going to create a data model and an RTF.
First create a data model which we had learnt in previous lessons which is shown below

For this data model primarily we have to generate one .XML file.
How we have to generate .XML file shown below. Follow below navigation
For that go to FILE menu-àGenerate to fileàXML which is shown below
 When ever we select XML then system will ask where to save .XML file which is shown below

Provide proper File name and then save in appropriate location

When ever we open the .XML file what we have generated should be like

Now we have to Design our template layout:

Use the Microsoft word or any word processor to generate the template layout, while saving save the document with RTF extension. Let us call this template file as Manual_Report.rtf

Now we have to Associate XML data to layout

·         Once XML publisher is installed successfully, a new menu bar will be found by name “Template Builder”. Navigate through Template Builder => Data => Load XML Data.
        Which is shown below

When ever we give click on Load XML Data, system will ask for to load the XML data what we had generated which is shown below


Here is our .xml file(Manual_Report.xml). Select the file and click on ‘Open’.

Here we will get one pop window with message like Data loaded successfully.

Now we have to insert the XML Publisher simplified tags

·         Click on Template Builder => Insert => Fields.
·         From Field message dialog choose the required field and click insert.
Simplified tags can be inserted in two ways, first by fields where the xml simplified tag is inserted in the help text, secondly by using syntax <? TAG ?>. A form field is called a placeholder.
This is shown below.


When ever we click on ‘All Fields’ we will see below window which is nothing but XML tags.

Now we have to publish the report

·         Click on Template Builder => Preview => HTML/PDF/Excel/RTF (any format).
 Here we get the output shown below


XML publisher Process Overview


XML publisher Process Overview

Process Overview:-
Creating customized reports using XML Publisher can be divided into two phases
  • Design time
  • Run Time
Design time: -
    1. Register the E-business suite report as a Data Definition in the Template Manager.
                                       Create a Data definition in the Template Manager for E-business Suite reports that
                                       We wish to customize using XML Publisher. When you create the Data Definition
                                       Code must match the E-Business Suite report short name.
    1. Design our template
                  Our template files can be either in Rich Text Format (RTF) or Portable Document.
                  RTF is a specification used by many word processing applications, such as
                  Microsoft word. We design the template using our desktop word processing
                  Application and save the file as an RTF file type (.rtf extension). Insert basic
                  Markup tags to the document to prepare it for merging with the XML data. XML
                  Recognizes the formatting features that we apply and converts them to XSL-FO.
                  Use Adobe Acrobat to apply markup tags to your custom-designed or
                  Downloaded PDF template
    1. Register out template in the Template Manager
                  When we create the Template Manager, we register and upload our RTF
                  Or PDF template files. The template must be assigned to the Data definition
                  Code of the E-Business Suite report with which it will be merged.
    1. Add desired translations of your RTF template
                  XML Publisher’s translation utility allows us to extract the translatable strings
                  From your template into an XLIFF file. Translate the strings in this file and re-
                  upload to the Template Manager to make translation available at runtime.
Run Time: -
1.        Set the concurrent program to generate XML.
2.        Run the concurrent program using standard request submission to obtain the XML
Output.
3.        Run the XML Publisher Concurrent Request .
The XML Publisher Concurrent Request will prompt us to enter the Request ID from the previous step, and t select a template, template locale, and output type. Available templates are those associated to the report Data Definition in the Template Manager. XML Publisher merges our design template with the XML data to generate your customized output.

XML publisher comparison with Report Builder


XML publisher comparison with Report Builder


LAY OUT :


Data Source for report builder:
In report builder, we should always use DATA MODEL as the data source.
DATA MODEL is the place where we provide SQL statements to fetch data from the data base.

XML publisher: -
Data Template:
Using java we can develop xml output. i.e. we should define concurrent program with executable NAME ‘XDODTEXE’ .


REPORT BUILDER


PLSQL
Using java we can develop xml output. I.e. we should define concurrent program with executable type as ‘JAVA’.
JAVA
Using java we can develop xml output. I.e. we should define concurrent program with executable type as ‘JAVA’.

  • In report builder we have a data model and layout, but in XML we have data model and an RTF.
  • By using report builder we can get only output, but by using XML publisher we can get multiple outputs like PDF, HTML, EXCEL, and RTF.
  • By using XML we can email or fax the output directly but report cannot.

Layout of an Report Builder: -


Template Of an RTF: -

XML publisher comparison with Discoverer


XML publisher comparison with Discoverer


Discoverer:-
Introduction
Oracle Discoverer is part of Oracle's Business Intelligence set of tools. Discoverer is intended to provide end users easy access to data and allow them to do data analysis and set-up ad-hoc queries.
Is a retrieval tool that works on a relational database whether it is designed for online transaction processing (OLAP) or as a data warehouse.

Discoverer is an end user reporting tool, providing the ability to generate high end reports, typically with a chart and drillable table. BIP is targeted at the other end of the spectrum, where Oracle Reports sits. It has some disco like capabilities but its strengths lie in generating documents e.g. invoices, POs, letters, listing reports, etc. It can also generate electronic formats, EFT, EDI, XML, etc.
In its standalone flavor, it comes as a server component, managing users, report security, scheduling, real time reports, etc.

So, it overlaps a little with Disco, it overlaps far more with Oracle Reports. It the strategic operational reporting solution going forward, its bundled with BIEE. BIEE being the Oracle BI product going forward. we dont think you'll find Disco shipping with BIEE.


Output of Discoverer: -

Out put of XML: -